
There’s something special about Easy Homemade Garlic Knots the way their warm, garlicky aroma fills the kitchen and makes everyone wander in for a taste. They are small bites of comfort that feel like an old friend: familiar, satisfying, and endlessly forgiving. Clara believes that making your own is easier than you think, even if you are new to dough. With a little patience and a few simple steps, you’ll have knotty, buttery pieces of joy to share.
If you like making simple homemade staples, you might also enjoy trying a gentle, hands-on project like homemade coconut yogurt sometime. It’s another little kitchen win that builds confidence and smells lovely while it sets.
Why You’ll Love Making This Easy Homemade Garlic Knots
There is comfort in rituals, and tying knots from dough is one of those small rituals that makes the kitchen feel like home. I started making garlic knots on quiet Sunday afternoons when I wanted to fill the house with something simple and cheerful. They are quick enough for a weeknight and charming enough for guests.
You’ll love this recipe because it uses store-made pizza dough as a shortcut, but still tastes completely homemade. The dough rises only twice, so you get great texture without a full day of waiting. The garlic butter finish is bold and honest. It gets brushed on warm, so the knots soak up just enough flavor to be irresistible.
These garlic knots are flexible. Make them plain, cheesy, herbal, or spicy. Serve them with tomato sauce, soup, or a green salad. They travel well to picnics and are perfect for dipping. That little golden crust and pillowy inside is exactly what I want when I’m craving something warm and satisfying in minutes.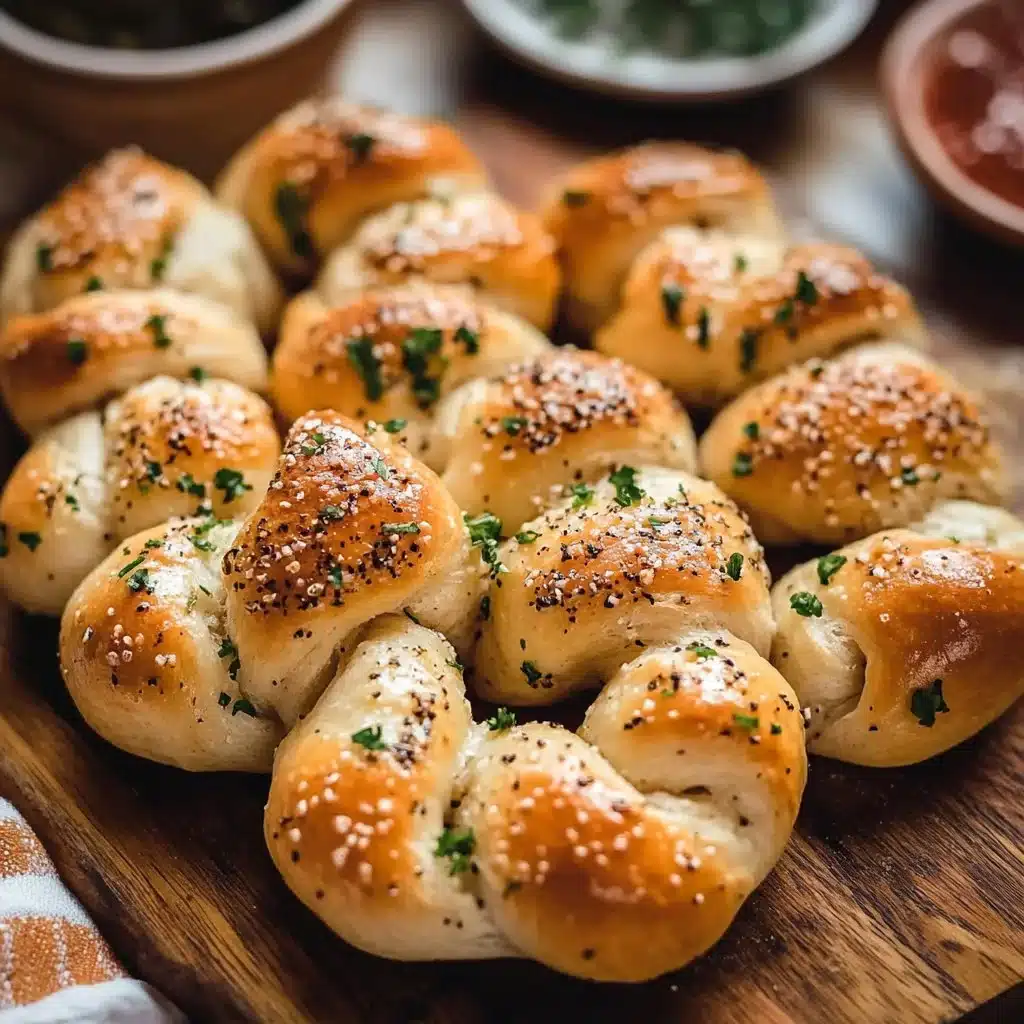
Step-by-Step: How to Make Easy Homemade Garlic Knots
“Cooking isn’t about perfection. It’s about enjoying every delicious step.”
Before we start, a short plan so you feel steady and prepared. Read the ingredient list once and pull things together: measure your flour, check the dough is thawed, warm the water gently, and set your butter nearby. Little prep makes each step feel calm.
I will walk you through how the dough behaves, what the knots should look like, and how to know when they are just right in the oven. Listen for sensory cues a soft, elastic dough, a sizzle when butter hits the crust, a golden color when you pull them out. Those cues will guide you.
Ingredients You’ll Need for Easy Homemade Garlic Knots
1 lb refrigerated store-made pizza dough or frozen pizza dough, thawed – use quality dough for the best texture.
½ cup warm water (not hot, approx 100-110°F) – warmth activates yeast without killing it.
1 tablespoon instant yeast or active dry yeast – instant works fast; active dry needs proofing.
1 teaspoon sugar – feeds the yeast and gives a gentle tenderness.
2 cups all-purpose flour – reliable and versatile.
½ teaspoon salt – balances flavor.
½ teaspoon garlic powder (optional) – a little boost if you want extra garlic.
1 tablespoon olive oil or melted butter – olive oil for a lighter crust, butter for richer flavor.
5 tablespoons unsalted butter, melted – use real butter for rich flavor.
3 garlic cloves, peeled and minced or ½ teaspoon garlic powder – fresh garlic gives the best aroma and bite.
1 teaspoon Italian seasoning – makes a simple, herby base.
¼ teaspoon salt – brings out the garlic and butter.
¼ cup grated Parmesan cheese for sprinkling after baking (optional) – salty, nutty finish.
2 tablespoons chopped fresh parsley for serving (optional) – fresh herbs make all the difference.
These ingredients are straightforward and easy to find. If you already have a block of Parmesan, grate it fresh; it melts better and tastes brighter.
Directions: Cooking with Confidence
- Add ¼ cup of warm water to a large bowl stand mixer fitted with a dough hook, along with the sugar and yeast. Stir and let stand for a few minutes. If using active dry yeast, let sit for 5-10 minutes until foamy.
- Watch for a light foam on the surface when using active dry yeast. That foam tells you the yeast is alive and ready. If nothing happens after 10 minutes, it’s safer to start again with fresh yeast.
- Add flour and salt to the yeast mixture. Stir the olive oil into the remaining water and pour into the bowl. Stir with the dough hook until the dough comes together.
- You should see the flour start to cling and the dough form a loose ball. Keep the mixer on low so it blends evenly. If the dough looks dry, add a teaspoon of warm water at a time; if sticky, add a touch more flour. We want smooth, slightly tacky dough.
- Knead for 3-4 minutes with a stand mixer (or 5-10 minutes by hand) until you have a smooth, non-sticky dough. Place it in an oiled bowl, cover, and let rise in a warm place for 30 minutes.
- The dough becomes elastic and springy when it’s kneaded enough. Press with a finger and it should gently bounce back. Cover loosely with a damp towel or plastic wrap and set it somewhere warm, like an oven with the light on. Thirty minutes is enough for a modest rise with store dough.
- Punch down the risen dough and roll it out into a rectangle. Cut into 10-14 strips.
- Press down gently to release large air bubbles. On a lightly floured surface, roll the dough into a rectangle roughly 10 by 12 inches. Use a sharp knife or bench scraper to cut into strips about 1 to 1.5 inches wide. The size determines how fluffy each knot will be.
- Roll each strip into a rope and tie into knots. Place on a baking sheet lined with parchment paper, cover loosely, and let rise for another 30 minutes. Preheat the oven to 400°F.
- Rolling into ropes is simple: use both hands and roll outward from the center. When tying the knot, loop once and tuck the end under or through so it won’t unravel. Arrange knots with a little space for them to puff.
- Melt butter and mix in garlic, Italian seasoning, and salt. Brush this mixture onto the knots, reserving some for later.
- The butter should be warm, not hot, to keep those fresh garlic pieces from browning too quickly. Brush the knots generously that first coat helps form a golden crust and lets the garlic flavor soak in.
- Bake for 12-20 minutes until golden.
- Watch closely after 12 minutes. Ovens vary. You want a warm, golden brown on the top and edges that look crisp. A few darker spots are fine; they add character. If the tops brown too fast, tent lightly with foil.
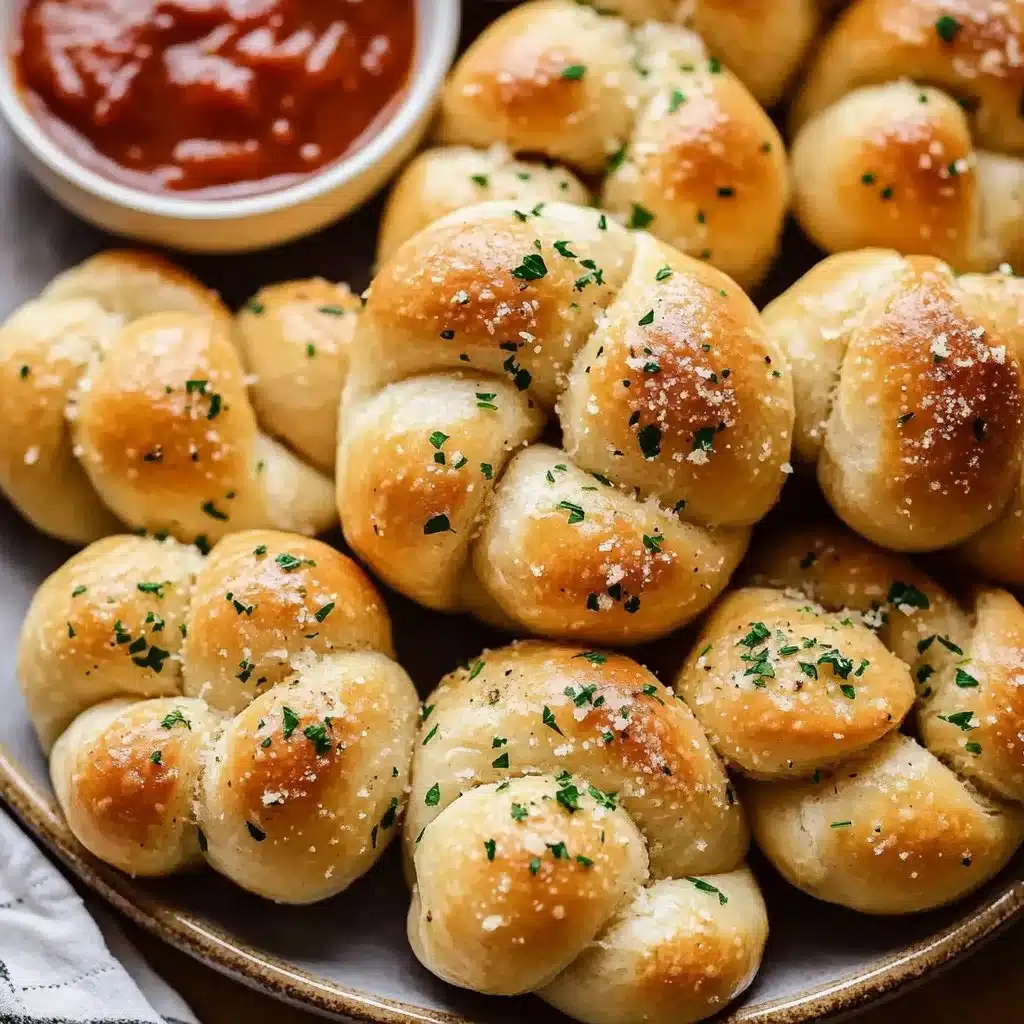
- Brush with remaining garlic butter and sprinkle with Parmesan and parsley. Serve warm with marinara sauce for dipping.
- Brushing the knots as soon as they come out of the oven lets the butter melt into every crevice. The Parmesan adds a savory finish and parsley brightens the flavor. Serve immediately for the most tender texture. The contrast between the buttery, garlicky crust and the pillowy interior is delightful.
These directions are practical and forgiving. If the dough feels cold, give it more time to rise. If the garlic is too strong for someone at your table, reduce cloves or use garlic powder. The goal is a warm, confident result, not perfection.
How to Serve Easy Homemade Garlic Knots and Make It Shine
Garlic knots are versatile. Serve them warm on a platter alongside a bowl of homemade marinara for dipping. They also work beautifully with a light toss of olive oil and extra herbs for a party basket.
If you want a fuller meal, pair them with a simple salad, roasted vegetables, or a cozy bowl of soup. Garlic knots are especially lovely with creamy soups; they soak up broth and bring that buttery garlic flavor along. For a cheesy touch, serve them with melted mozzarella or a side of ricotta mixed with lemon zest.
Presentation matters in a friendly, low-pressure way. Arrange the knots in a shallow basket lined with a clean towel to keep them warm. Sprinkle the Parmesan and parsley right before serving so the herbs stay bright. If you’re sharing, include a small dish of chili flakes or a drizzle of good olive oil for people to customize.
For pairing ideas that match this comforting, savory profile, try low-effort baked breads like buttery cheese garlic rolls alongside a salad for weekend brunch.
How to Store Easy Homemade Garlic Knots for Later
Keep them fresh with simple steps. Once cooled to room temperature, store leftover garlic knots in an airtight container or a resealable bag for up to 2 days at room temperature. For longer storage, refrigerate for up to 4 days.
To freeze, wrap the cooled knots individually in plastic wrap and place them in a freezer bag. They keep well for up to 3 months. Thaw overnight in the refrigerator before reheating.
Reheating is quick and forgiving. To revive the texture, heat in a 350°F oven for 8-10 minutes from chilled, or 12-15 minutes from frozen. You can also reheat in an air fryer at 325°F for a few minutes. Microwave reheating is fastest but can make them soft; if you must microwave, warm briefly and then finish in a skillet or oven to crisp the exterior.
If the garlic butter has settled, brush a little fresh melted butter on when reheating to restore shine and flavor. A quick sprinkle of fresh parsley right before serving brightens the taste and makes leftovers feel special.
Clara’s Tips for Success
- Temperature matters. Use warm water about 100-110°F to wake the yeast without shocking it. If the water is too hot it can kill the yeast, and if it is too cold, the dough will be slow to rise.
- Don’t overdo flour. Dough should be soft and slightly tacky. If you see dry patches while kneading, add a teaspoon of water instead of dumping more flour. Soft dough yields tender knots.
- Use fresh garlic if you can. Minced fresh garlic gives the most pleasing aroma and texture. If you need convenience, garlic powder works fine but reduce the amount slightly to avoid a powdery finish.
- Reserve some butter for after baking. Brushing again when they come out of the oven keeps the knots glossy and helps the herbs and cheese stick.
- Make-ahead tip: You can form the knots, place them on a sheet, cover tightly, and refrigerate overnight. Bring them to room temperature for 30-45 minutes, then bake as directed. This is great for morning prep before a gathering.
I often keep a small jar of garlic butter in the fridge to brush finishing touches on warm bread. It keeps well for a week and saves time.
For a cozy pairing that complements these garlic knots when you want soup and bread in one comforting meal, try adding a bowl of cheddar garlic herb potato soup. The flavors marry beautifully and make for a satisfying, simple meal.
Simple Variations to Try
- Cheesy Knots: Before tying, sprinkle shredded mozzarella or grated Parmesan into the center of the rope and pinch closed. Bake as directed and brush with garlic butter after baking for gooey, cheesy bites.
- Herb-Rich Knots: Mix fresh chopped rosemary, thyme, or basil into the garlic butter. The fresh herbs will crisp lightly on the surface and give an aromatic lift.
- Spicy-Sweet Knots: Add a pinch of red pepper flakes to the butter and finish with a light drizzle of honey for a playful sweet-heat contrast.
- Olive and Sun-Dried Tomato Twist: Press small pieces of chopped olive or sun-dried tomato into the center before forming, or sprinkle on top after brushing with butter for a Mediterranean spin.
- Whole-Grain or Garlic-Infused Dough: Substitute half the all-purpose flour with whole-wheat for a nuttier flavor, or knead in a tablespoon of roasted garlic paste for deeper garlic notes inside the dough.
Each variation uses the same basic technique, so you can experiment confidently. Taste as you go and trust simple adjustments.
Easy Homemade Garlic Knots
Ingredients
Method
- In a large bowl, combine ¼ cup of warm water, sugar, and yeast. Stir and let stand for a few minutes until foamy.
- Add flour and salt to the yeast mixture. Stir in olive oil and remaining water, then mix until the dough comes together.
- Knead the dough for 3-4 minutes with a stand mixer (or 5-10 minutes by hand) until smooth. Place in an oiled bowl, cover, and let rise in a warm place for 30 minutes.
- Punch down the risen dough and roll it into a rectangle. Cut into 10-14 strips.
- Roll each strip into a rope and tie into knots. Place them on a baking sheet lined with parchment paper, cover, and let rise for another 30 minutes.
- Preheat the oven to 400°F. Melt butter and mix in garlic, Italian seasoning, and salt. Brush this mixture onto the knots.
- Bake for 12-20 minutes until golden brown, brushing with remaining garlic butter after baking and sprinkle with Parmesan and parsley.
Nutrition
Notes
Tried this recipe?
Let us know how it was!FAQs About Easy Homemade Garlic Knots
Can I make this ahead of time?
Yes. You can form the knots and refrigerate them overnight. Take them out 30-45 minutes before baking to come up to room temperature, then bake as directed. This makes mornings or party prep much smoother.
What if my dough is sticky or dry?
If it is sticky, add a touch of flour, a teaspoon at a time, while kneading. If it is dry, add a teaspoon of warm water at a time. Aim for soft, slightly tacky dough that springs back when poked.
How can I make these dairy-free?
Use olive oil in place of the butter for both the dough and the brushing stages. Nutritional yeast can be used instead of Parmesan for a savory finish. Fresh herbs will keep the flavor bright.
Can I use homemade dough instead of store-bought?
Absolutely. If you prefer to make your own dough, use a simple pizza dough recipe and follow the same shaping and baking times. Homemade dough may need slightly longer rising times, so watch for that soft, elastic feel before shaping.
How do I know when they are done?
They are done when the tops are golden-brown and the bottom feels set. The internal texture should be tender, not dense. If you want to be precise, an internal temperature of about 190°F is a reliable indicator.
Are the knots freezer-friendly?
Yes. Freeze cooled knots in an airtight bag up to 3 months. Reheat from frozen in a 350°F oven for about 15-20 minutes, brushing with a little extra butter toward the end.
Conclusion
You’ve learned how to make Easy Homemade Garlic Knots with confidence, step by step. This recipe is forgiving, flexible, and rewarding. If you want to compare different approaches or get extra inspiration for shaping and seasonings, check out a clear, tested version at Homemade Garlic Knots (Quick and Easy!) | The Recipe Critic. For a baker’s perspective with detailed tips and variations, take a look at Homemade Garlic Knots – Sally’s Baking.
I hope this Easy Homemade Garlic Knots helps you discover how simple and rewarding homemade cooking can be. You’ve got this.