
There’s something special about Baking Soda Growing Tree — the way its aroma fills the kitchen and makes everyone wander in for a taste. This delightful creation promises not just a fun and educational experience, but also the thrill of watching something grow right before your eyes. Making a baking soda growing tree is more than just a simple kitchen experiment; it’s an opportunity to share a unique moment with family or friends. It inspires curiosity, creativity, and a sense of accomplishment that lasts long after the baking soda has settled.
Why You’ll Love Making This Baking Soda Growing Tree
Making a Baking Soda Growing Tree is such a rewarding experience. It’s straightforward to put together, which makes it perfect for beginners or those looking for a simple yet fascinating kitchen project. The cool thing about this recipe is that it requires common ingredients you probably already have at home.
Imagine gathering around the kitchen table, laughter and eager conversations filling the air as everyone watches the crystals slowly grow. This satisfies a creative urge while also feeding a sense of scientific wonder — it’s like bringing a bit of nature right inside your kitchen.
Furthermore, it’s a fantastic way to explore the science of crystals in a fun and engaging method. Each step leads to amazement when you see the tree transform from a simple structure into a glittering marvel. It could even become a cherished memory, a story you share whenever friends or family ask how you made such an enchanting piece.
Step-by-Step: How to Make Your Baking Soda Growing Tree
“Cooking isn’t about perfection. It’s about enjoying every delicious step.”
Getting ready to make your Baking Soda Growing Tree will be as easy as pie. Here’s an overview of what you will need and the steps to follow. Gather the ingredients and let’s dive into this exciting culinary adventure together.
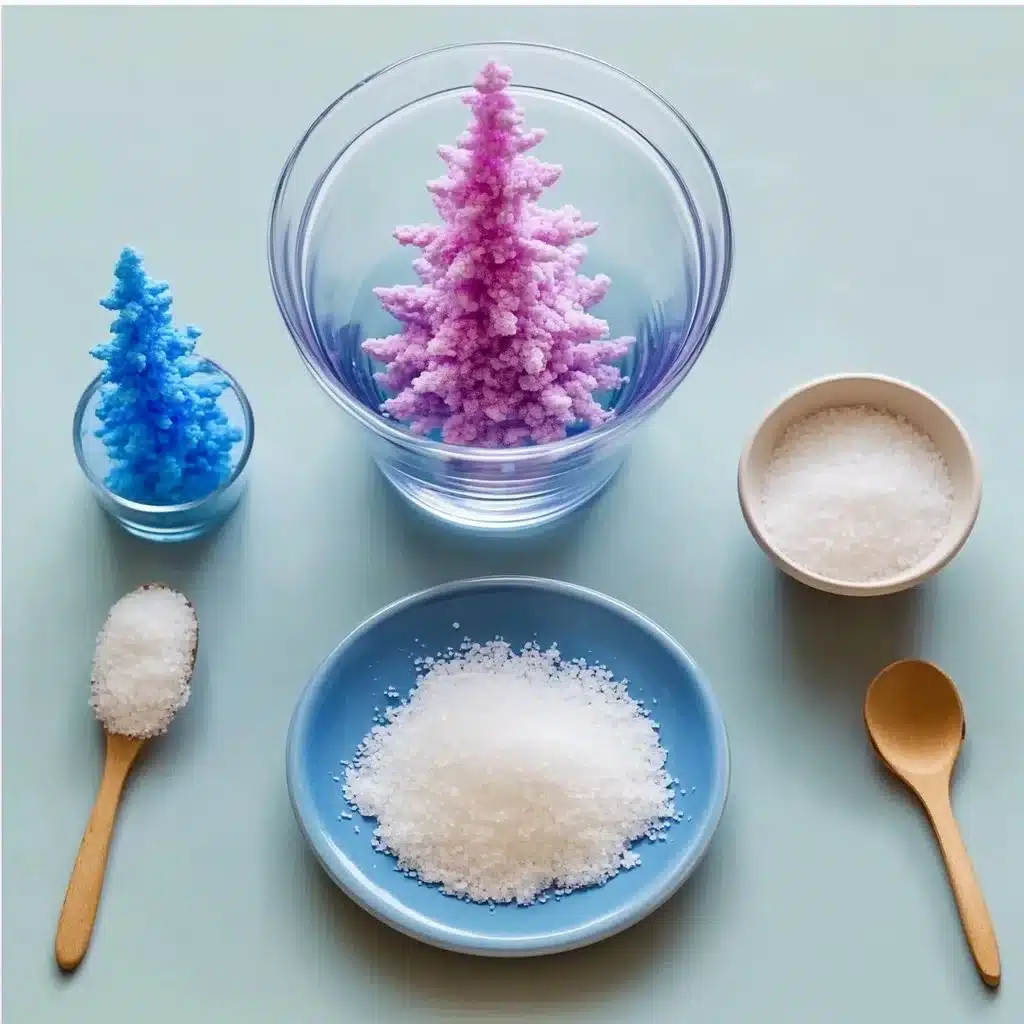
Ingredients You’ll Need for Baking Soda Growing Tree
- Baking soda (sodium bicarbonate) – this is the main ingredient that will help create the crystals.
- Warm water – it should be comfortably warm but not boiling.
- Table salt (optional) – can enhance the crystal structure.
- A shallow glass dish or small jar – this will be your growth container.
- A small glass or plastic cup for mixing – you’ll use this to combine your ingredients.
- A spoon for stirring – you need something sturdy to mix.
- Pipe cleaners or a small twig (optional) – these will serve as the base for your tree.
- Food coloring or liquid watercolor (optional) – adds color to your crystals, making them even more fun.
- Tweezers or a toothpick (optional) – these will help in adjusting the structure if needed.
Each ingredient plays a vital role in creating a beautiful display of crystals that will make your heart smile.
Directions: Cooking with Confidence
Let’s now jump into the fun part — creating our Baking Soda Growing Tree! Follow these simple steps and take your time. Each step will guide you closer to a stunning crystal creation, and trust me, you can do this!
- Prepare a calm workspace: Clear your kitchen table and gather all your materials. It’s important to have a clean surface to work on, so lay down a towel to catch any spills.
- Warm the water: Heat the water until it feels comfortable to the touch. You want it warm, not boiling, as we need it to dissolve the baking soda properly.
- Measure the baking soda: Take about 2-3 tablespoons of baking soda and pour it into your mixing cup. This is where the magic begins!
- Mix in the water: Slowly pour the warm water into the baking soda. Stir gently until the solution looks clear. This is your crucial mixture.
- Optional flavoring: If you want a pinch of salt or a drop of food coloring, add that now. Stir gently to mix the colors through if added.
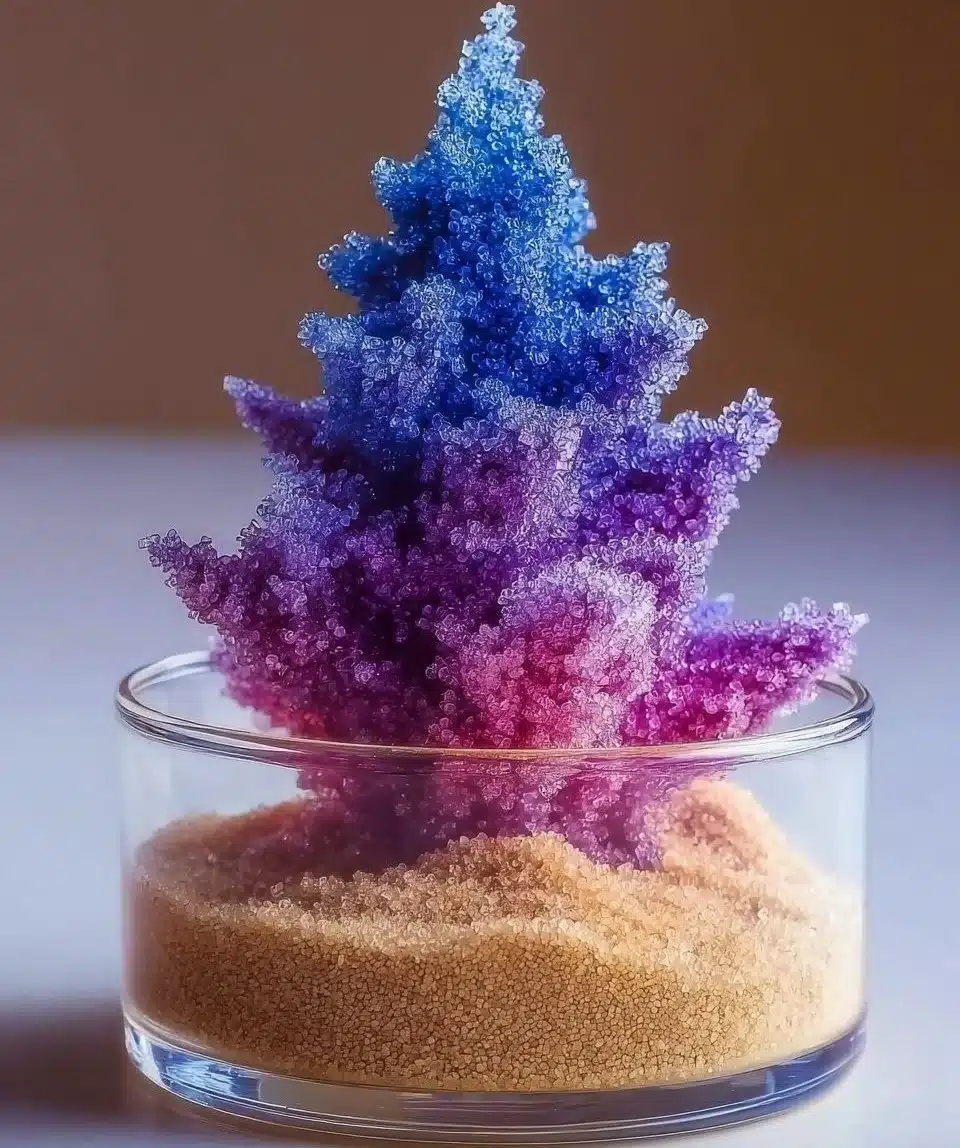
- Shape your tree: Get creative with your pipe cleaners or twig. Shape it into a tree form and ensure it’s anchored securely in the shallow dish or jar.
- Pour the baking soda solution: Carefully pour the baking soda water around the base of the tree. Don’t rush; take it slowly so as not to disturb your tree.
- Watch it grow: Now comes the exciting part! Keep an eye on your tree and look for the first crystals forming. Check every 15-30 minutes to admire the progress.
- Make adjustments if necessary: If some branches need positioning, use tweezers or a toothpick to gently tweak them.
- Let it sit: Allow your tree to remain undisturbed for several hours, letting the crystals grow thicker and more intricate.
- Final touches: Once you’re happy with the crystal formation, you can either let them dry or observe the growth for a bit longer.
You’ve just created a wonderful piece of art and science in your kitchen. The joy in watching those crystals bloom is an experience to cherish.
How to Serve Baking Soda Growing Tree and Make It Shine
Although your Baking Soda Growing Tree isn’t something you eat, it sure can be a beautiful centerpiece. Once your crystals have formed and your tree looks magnificent, consider placing it on a decorative plate or a small pedestal.
You can also set it in an area where light can shine through it, enhancing the iridescent nature of the crystals. If you’ve added food coloring, the colors can create vibrant displays, making it a conversation starter at home.
A fun idea is to create a little story around it. Perhaps this crystal tree symbolizes growth and ambition. Use it as a centerpiece during gatherings to inspire discussions about science or creativity. You might be surprised how engaged your friends and family become!
How to Store Baking Soda Growing Tree for Later
While your creation is breathtaking, it may not last forever. If you want to store your Baking Soda Growing Tree for later, handle it gently.
To keep your crystals intact, avoid touching them too much. If you want to preserve them, place your piece in a cool and dry spot, away from moisture. Storing it in a closed container can help to prevent fading or damage.
If your creation does start to lose its luster, you can always have another go! The beauty of this process is the freedom to experiment and create anew.
Clara’s Tips for Success
- Use distilled water: If you have it, using distilled water can lead to more vibrant crystal growth.
- Experiment with colors: Don’t hesitate to mix colors and see what beautiful patterns emerge!
- Patience is key: Just like in life, good things take time. Allow your tree ample time to grow crystal formations.
- Reinforce the base: Ensure your tree structure is stable in the solution so it doesn’t tip.
- Invite friends to join: This experiment is much more fun when shared. Get your family or friends involved to create unique trees together.
Simple Variations to Try
While the classic Baking Soda Growing Tree is wonderful as is, there are several fun variations you might enjoy.
- Crystal Shapes: Instead of trees, try shaping your structure into other shapes like stars or flowers using pipe cleaners.
- Salt Crystals: Substitute some of the baking soda with table salt for unique crystal variations.
- Different Colors: Use a variety of food colorings to create a rainbow effect on your crystals.
- Glow-in-the-dark option: If you can find glow-in-the-dark powders, they can lead to a magical effect when the lights go down.
Experiment and have fun, letting your imagination guide your next creation!
FAQs About Baking Soda Growing Tree
Can I make this ahead of time?
Yes, you can prepare your baking soda growing tree in advance. Just keep it in a safe, dry place until you’re ready to showcase it.
How long does it take for the crystals to form?
Typically, you’ll start to see crystals forming within a few hours, but the best results often take several days.
Can I reuse the baking soda solution?
It’s best to create a fresh solution for each project. Crystals tend to lose their magic after the first use.
Will the crystals stay forever?
While beautiful at first, crystals will eventually lose their structure if exposed to humidity or moisture.
Final Encouragement
I hope this Baking Soda Growing Tree helps you discover how simple and rewarding homemade cooking can be. You’ve got this. Cooking and crafting in the kitchen can bolster creativity, confidence, and connection. Every step you took leads you closer to a delightful end product you can be proud of. Enjoy your time in the kitchen, and remember, each recipe is only the beginning of your foodie adventure.

Baking Soda Growing Tree
Ingredients
Method
- Prepare a calm workspace: Clear your kitchen table and gather all your materials. Lay down a towel to catch any spills.
- Warm the water: Heat the water until it feels comfortable to the touch, ensuring it is warm but not boiling.
- Measure the baking soda: Pour about 2-3 tablespoons of baking soda into your mixing cup.
- Mix in the water: Slowly pour warm water into the baking soda, stirring gently until the solution looks clear.
- Optional flavoring: If using, add a pinch of salt or a drop of food coloring and stir gently.
- Shape your tree: Use pipe cleaners or a twig to shape your tree form and anchor it in your shallow dish.
- Pour the baking soda solution: Carefully pour the baking soda water around the base of the tree.
- Watch it grow: Keep an eye on your tree and look for the first crystals forming, checking every 15-30 minutes.
- Make adjustments if necessary: If branches need positioning, use tweezers or a toothpick to tweak them.
- Let it sit: Allow your tree to remain undisturbed for several hours to let the crystals grow.
- Final touches: Once you're happy with the crystal formation, you can let them dry or observe for a bit longer.