

There’s a quiet kind of peace that comes when a pot of Homemade Cheesy Breadsticks simmers gently on the stove. The kitchen fills with the inviting aroma of baking dough and melting cheese, wrapping us in warmth and comfort. It’s a moment to pause and connect with ourselves, nurturing not only our bodies but also our souls. As we gather the ingredients and begin to create this delightful bread, we are reminded that cooking is a sacred act of love. Each step is a way to care for ourselves and those we cherish.
A Gentle Recipe for Body & Soul
Homemade Cheesy Breadsticks bring nourishment that transcends mere ingredients. They are made with intention, inviting moments of calm as we knead the dough, filling our kitchens with the delightful smells of garlic and cheese. Eating these breadsticks evokes warmth, creating a cozy atmosphere where conversations can flow freely. With every bite, we share not just food, but an experience of comfort that invites everyone to feel at home, no matter where they are.
Step by Step: How to Prepare Homemade Cheesy Breadsticks
“Cooking is a quiet way of caring for yourself and the ones you love.”
Preparing Homemade Cheesy Breadsticks is an act of mindfulness. As you gather each ingredient, take a deep breath and notice the colors and textures. Feel the flour slip through your fingers and hear the yeast crackle to life in warm water. Before we dive into the steps, let’s embrace this peaceful journey together.
Wholesome Ingredients You’ll Need for Homemade Cheesy Breadsticks
To create these delightful breadsticks, you’ll need a mixture of simple, wholesome ingredients that come together in harmony. Here’s what you’ll need:
- 2 cups all-purpose flour
- 1 tablespoon sugar
- 1 teaspoon salt
- 1 packet (2 1/4 teaspoons) active dry yeast
- 3/4 cup warm water
- 2 tablespoons olive oil
- 1 cup shredded cheese (mozzarella or cheddar)
- 2 tablespoons butter, melted
- 2 cloves garlic, minced
- 1 teaspoon dried oregano
- 1/2 teaspoon garlic powder
Use fresh herbs if you can; they carry gentle energy that elevates the flavors. Each ingredient plays a role in creating not just food but also an experience of care and comfort.
Step-by-Step How to Prepare Homemade Cheesy Breadsticks
- In a bowl, combine warm water, sugar, and yeast; let sit until bubbly. This moment of waiting allows the yeast to awaken, infusing our breadsticks with lightness.
- In a mixing bowl, combine flour and salt. Add the yeast mixture and olive oil; mix until a dough forms. Take your time as you stir, allowing everything to come together beautifully.
- Knead the dough for about 5 minutes until smooth. Feel the dough beneath your hands, understanding how it transforms with your gentle pressure.
- Place the dough in a greased bowl, cover it, and let it rise in a warm place for about 1 hour or until doubled in size. This is a time to relax too; perhaps enjoy a cup of tea as the dough works its magic.
- Preheat your oven to 375°F (190°C). Let the warmth of the oven prepare for the baking to come.
- Roll out the dough on a floured surface and cut it into strips. As you shape them, think of all the ways these breadsticks might bring joy.
- Place the strips on a baking sheet and brush with melted butter mixed with garlic, oregano, and garlic powder. This addition creates a fragrant topping that will delight your senses.
- Top each strip with shredded cheese. Let the cheese blanket the strips, imagining it melting into gooey perfection.
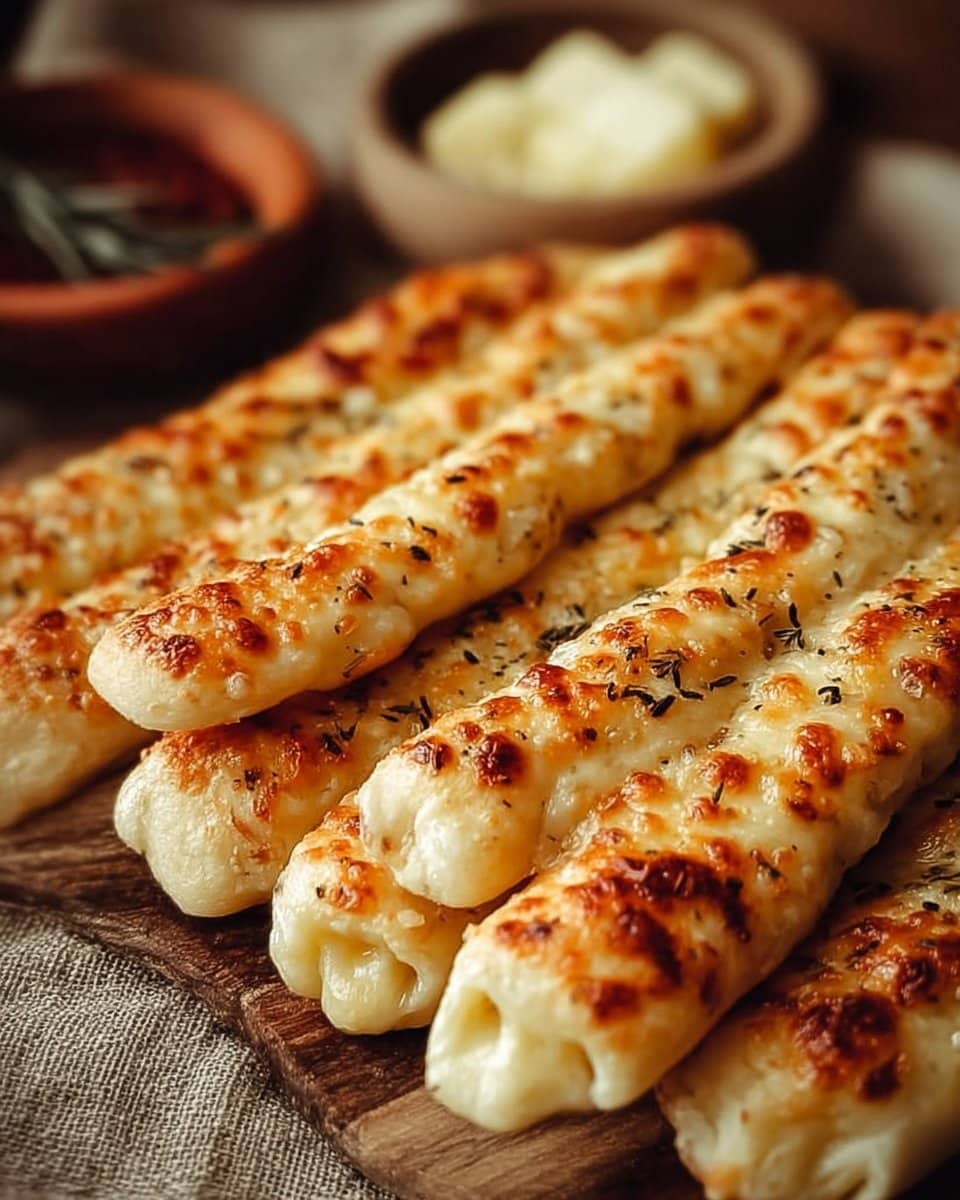
- Bake for 15-20 minutes or until golden and the cheese is bubbly. As they bake, the aroma that fills your home will be nothing short of enchanting.
- Serve warm. Take a moment to appreciate the beauty of your creation, and breathe in the warmth you’ve cultivated.
How to Serve Homemade Cheesy Breadsticks with Intention
When it comes to serving these Homemade Cheesy Breadsticks, presentation offers an opportunity to evoke warmth and connection. Arrange the warm breadsticks on a rustic wooden board or a gentle white platter. Perhaps add a small bowl of marinara sauce for dipping, showcasing the contrast of colors.
As you present your breadsticks, share a story about the first time you made them or a cherished memory tied to the recipe. Each breadstick is more than a snack; it’s a token of love and comfort, beautifully crafted through your hands. Allow your loved ones to gather around the table, letting the warmth of the freshly baked bread bring everyone together, enveloped in a blanket of shared experiences and flavors.
How to Store Homemade Cheesy Breadsticks the Right Way
To keep your Homemade Cheesy Breadsticks fresh and delightful, allow them to cool completely before storing. This helps maintain their texture and taste. Place them in an airtight container, either at room temperature for a day or two or in the refrigerator if you wish for longer freshness.
If you find leftover breadsticks, don’t worry; they often taste even better after resting. The flavors deepen and meld together in a comforting way. When you’re ready to enjoy them again, a gentle reheat in the oven makes them feel fresh and inviting once more.
Mama Lila’s Helpful Tips
- Use whole wheat flour for a heartier version. This substitution adds a wonderful nutty flavor while providing extra nutrients.
- If you are looking to reduce dairy, consider using dairy-free cheese or omitting it altogether, allowing the aromatic butter and herbs to shine through.
- Make the dough ahead of time, let it rise, and then refrigerate it overnight. This overnight treatment infuses richer flavors, bringing depth to your breadsticks.
- Add toppings like fresh herbs before baking to enhance the aroma and taste rosemary, thyme, or basil work beautifully.
- Serve these breadsticks with a simple side salad for a complete meal that nurtures your body and spirit.
Discover More Nourishing Recipes
Head over to our Recipe Trends page and uncover a world of fresh, plant-forward ideas that fit right into your daily routine. From vibrant seasonal flavors to calming, wholesome dishes, each recipe is designed to spark inspiration and bring a sense of balance to your kitchen. Find comfort, joy, and connection in every meal while exploring what’s trending right now.
Peaceful Variations to Explore
Exploring variations of Homemade Cheesy Breadsticks can be a joyful venture. Each twist offers new flavors and experiences. Consider the following peaceful adaptations:
- Substitute the cheese with any favorite meltable cheese like provolone or gouda for a unique twist.
- Add finely chopped spinach or kale to enrich the breadsticks with nutrients. This addition also imparts a beautiful green hue, making each bite feel vibrant.
- For a spicier kick, incorporate red pepper flakes into the melted butter mixture before brushing it on the strips.
- Think about a sweet version by adding a sprinkle of cinnamon and sugar to the dough, topped with a light glaze after baking for a delightful dessert option.
- If you have a slow cooker, you can create a cheesy breadstick dip by layering dough pieces with cheese and seasonings inside, slow-cooked to bubbly perfection.


Homemade Cheesy Breadsticks
Ingredients
Method
- In a bowl, combine warm water, sugar, and yeast; let sit until bubbly.
- In a mixing bowl, combine flour and salt. Add the yeast mixture and olive oil; mix until a dough forms.
- Knead the dough for about 5 minutes until smooth.
- Place the dough in a greased bowl, cover it, and let it rise in a warm place for about 1 hour or until doubled in size.
- Preheat your oven to 375°F (190°C).
- Roll out the dough on a floured surface and cut it into strips.
- Place the strips on a baking sheet and brush with melted butter mixed with garlic, oregano, and garlic powder.
- Top each strip with shredded cheese.
- Bake for 15-20 minutes or until golden and the cheese is bubbly.
- Serve warm on a rustic wooden board or white platter with marinara sauce for dipping.
Nutrition
Notes
Tried this recipe?
Let us know how it was!Common Questions About Homemade Cheesy Breadsticks
Can I make this ahead of time?
Yes, preparing the dough ahead can enhance the flavors, and it often tastes even more comforting the next day. Simply let it rise and once baked, store it as suggested.
What kind of cheese works best?
Mozzarella and cheddar are popular choices for their wonderful melting properties. However, feel free to experiment with your favorite cheeses.
How can I make my breadsticks garlic-flavored?
Simply increase the amount of minced garlic in the butter mixture or add garlic powder to the dough itself for a more pronounced garlic flavor.
What if my dough doesn’t rise?
Patience can help here. If the yeast fails to activate, making sure your water is warm but not hot can bring life back to the dough. If it still doesn’t rise, a longer resting period might be necessary.
Can I freeze my Homemade Cheesy Breadsticks?
Absolutely. Once baked, cool completely and wrap them tightly in plastic wrap before freezing. When ready to enjoy, defrost in the fridge overnight and reheat in the oven for best results.
Final Reflection or Closing Note
As you reflect on your experience with Homemade Cheesy Breadsticks, take a moment to honor the care and intention you’ve poured into each step. I hope this recipe brings you the same peace and warmth it has offered me in my home. Cooking is an art of love, and these breadsticks embody that love, inviting you and your loved ones to gather in serenity and nourishment each time they grace your table. May every batch continue to weave connection and comfort into your life.
Connect with Feel the Recipes
Cooking is more than making a meal it’s a way to care for ourselves and those we love. Lila shares simple, nourishing recipes and mindful kitchen moments to bring calm and joy to your table.
Join a community of home cooks who value balance, wellness, and the beauty of seasonal ingredients. Together, we can create food that heals and inspires.
🌿 Facebook: Follow us for thoughtful tips and new recipes
📌 Pinterest: Save nourishing recipes and seasonal ideas
🐦 X (Twitter): Gentle reminders and plant-based inspiration
📸 Instagram: @feeltherecipes for peaceful kitchen moments
Let’s create meals with intention. Whether you’re starting your plant-based journey or simply seeking balance, we’re here to support you one recipe at a time.