
There’s something comforting about Cheesy Chicken Garlic Wraps the way the garlic and butter aroma fills the kitchen, the soft tortillas warming in your hands, and the first bite when cheese pulls just a little. These wraps are simple, honest food that makes weeknights feel special and busy afternoons feel calm. Clara is right beside you, guiding each step, so you can relax and enjoy the process.
If you like one-pan cooking and flavors that are familiar but a little playful, you will love this recipe. It’s forgiving, quick, and built to please both kids and adults. You can make it with pantry staples, stretch it to feed guests, or keep it cozy for a solo lunch. For a creamy, snackable pasta night inspired by similar garlic and cheese comforts, try this creamy garlic parmesan chicken pasta for another family-friendly option.
Why You’ll Love Making This Cheesy Chicken Garlic Wraps or The Story Behind My Cheesy Chicken Garlic Wraps
I started making these wraps on nights when I wanted something warm, filling, and quick. The first time I made them, the kitchen filled with the sizzle of chicken and the smell of garlic. My family showed up in the doorway, exactly like yours might. We shared them with a simple salad and everyone went back for seconds.
These wraps are built for real life. They work whether you are learning basic pan skills or you already cook regularly. The recipe gives you clear timing, sensory clues like the golden edge on the tortilla, and small variations so you can make it your own. The ingredients are forgiving. If taste or texture needs adjusting, you will find easy fixes that keep the meal on track.
Step-by-Step: How to Make Cheesy Chicken Garlic Wraps or Your Kitchen Game Plan
“Cooking isn’t about perfection. It’s about enjoying every delicious step.”
Before we jump into the pan, take a moment to prepare your space. Lay out your ingredients, measure the cheese into a bowl, chop the parsley, and have a spatula in hand. Quick setup clears your head and makes each step flow.
Here’s the short plan: season the chicken, cook it until golden, assemble with creamy garlic sauce and cheese on warm tortillas, then grill the wraps briefly to melt the cheese and crisp the outside. The whole process takes about 20 to 30 minutes from start to finish once you are comfortable.
Ingredients You’ll Need for Cheesy Chicken Garlic Wraps
- 2 large chicken breasts, diced (trim visible fat for even cooking)
- 4 large flour tortillas (room temperature so they fold easily)
- 1 tablespoon olive oil (or use butter for a richer flavor)
- 2 teaspoons garlic powder (or 2 cloves minced fresh garlic for brighter taste)
- 1 teaspoon onion powder
- 1 teaspoon paprika (gives gentle color and warmth)
- Salt and pepper, to taste (start light, you can always add more)
- 1 cup shredded cheddar cheese (sharp cheddar gives stronger flavor)
- 1/2 cup shredded mozzarella cheese (for melty, stringy texture)
- 1/2 cup creamy garlic sauce (store-bought or homemade for extra love)
- Fresh parsley, chopped (fresh herbs make all the difference)
Notes: use real butter for rich flavor if you prefer over olive oil. If you like more garlic flavor, swap the garlic powder for fresh garlic in the pan. If you want a lighter wrap, use whole wheat tortillas or smaller flour tortillas to make handheld tacos.
Also keep in mind this combination of cheeses gives you both sharp flavor and stretch. If you only have one cheese, the wrap will still be delicious.
Directions: Cooking with Confidence
- In a bowl, combine the diced chicken with olive oil, garlic powder, onion powder, paprika, salt, and pepper, ensuring the chicken is evenly coated with the seasonings.
- Use a medium bowl and toss gently with a fork or clean hands.
- Make sure each piece has a light coating so the spices brown nicely in the pan.
- Clara tip: let the chicken sit for 5 minutes if you can. Short resting time helps the flavors begin to soak in.
- Heat a non-stick pan over medium heat. Add the seasoned chicken to the pan and cook for about 6-8 minutes, stirring occasionally, until the chicken is golden and fully cooked through.
- Listen for a steady sizzle when the chicken hits the pan. If the pan makes an almost-silent sound, it needs a touch more heat.
- Stir every 1 to 2 minutes so pieces cook evenly and get small golden edges.
- Check doneness by cutting one piece; it should be white through and juices should run clear. If you have an instant-read thermometer, the target is 165°F (74°C).
- Remove from heat and let cool slightly. Cooling prevents the heat from wilting your tortillas and keeps the cheese from sliding after assembly.
- Lay the tortillas out on a flat surface. Spread a layer of creamy garlic sauce over each tortilla.
- Use a small spoon or the back of a knife to spread about 1 to 2 tablespoons of sauce per tortilla.
- The garlic sauce keeps the wrap moist and balances the spices. If your sauce is thick, thin it a touch with a teaspoon of milk.
- Evenly distribute the cooked chicken on top of each tortilla.
- Aim for a long line of filling down the center, leaving about an inch at each edge. This makes folding easier.
- Try not to overload. Too much filling makes the wrap hard to fold and grill.
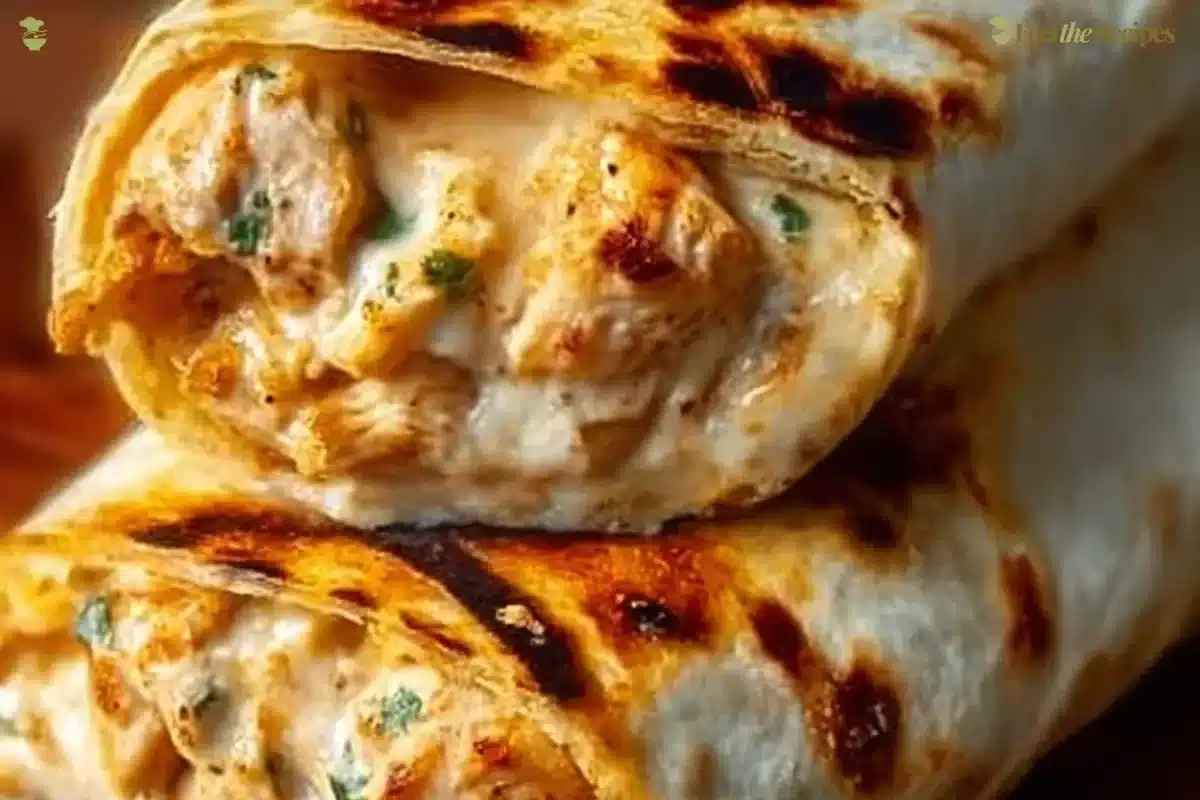
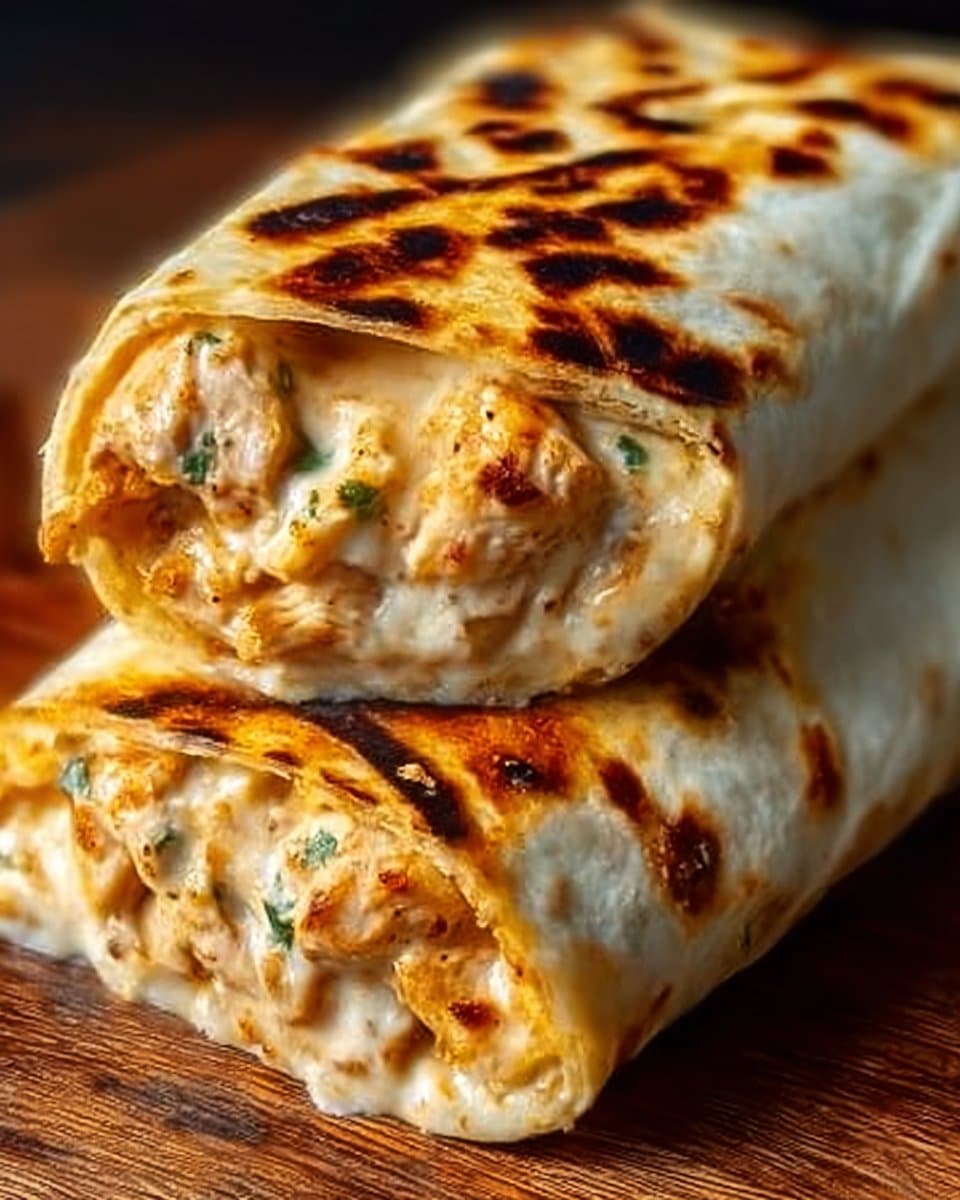
- Sprinkle with shredded cheddar and mozzarella cheese.
- Be generous but even. A layer of cheddar first gives flavor, the mozzarella melts into a stretchy finish.
- The cheese will bind the wrap and give you the satisfying pull when you bite in.
- Fold the tortillas over the filling, creating a wrap.
- Fold one side over, then tuck the ends in slightly and roll away from you to close.
- If the tortilla resists folding, warm it briefly in the microwave for 10 seconds to make it more pliable.
- In the same non-stick pan, grill the folded wraps for 2-3 minutes on each side, or until the cheese is melted and the tortillas are golden and crispy.
- Return the pan to medium heat and add a small dot of butter or drizzle of olive oil to help crisp the exterior.
- Use a spatula to press gently, creating contact between tortilla and pan. You want golden brown spots, not burned areas.
- Flip once. After the first side is golden, the second side will be quicker. Watch closely.
- Remove from the pan and cut each wrap in half. Garnish with freshly chopped parsley, if desired, and serve immediately.
- Using a sharp knife or a serrated blade gives cleaner halves.
- Serve hot. The texture is best when warm and cheesy.
- Clara’s reminder: let the wraps rest a minute if the cheese is bubbling fiercely. A short rest keeps the filling from escaping when you cut.
Throughout the process, trust your senses. The smell of garlic, the sight of golden-browned chicken, and the gentle crisp of the tortilla are cues that you are on the right track. If something looks or smells off, pause and adjust. Cooking is forgiving, and small fixes more salt, a little more heat, a minute longer bring the dish home.
How to Serve Cheesy Chicken Garlic Wraps and Make It Shine
Think simple and colorful. Serve the wraps on a warm plate and tuck in a bright salad next to them. A crisp green salad with a light lemon vinaigrette contrasts wonderfully with the rich garlic sauce. For something heartier, roasted potatoes or sweet potato fries make a cozy side.
Plating tips:
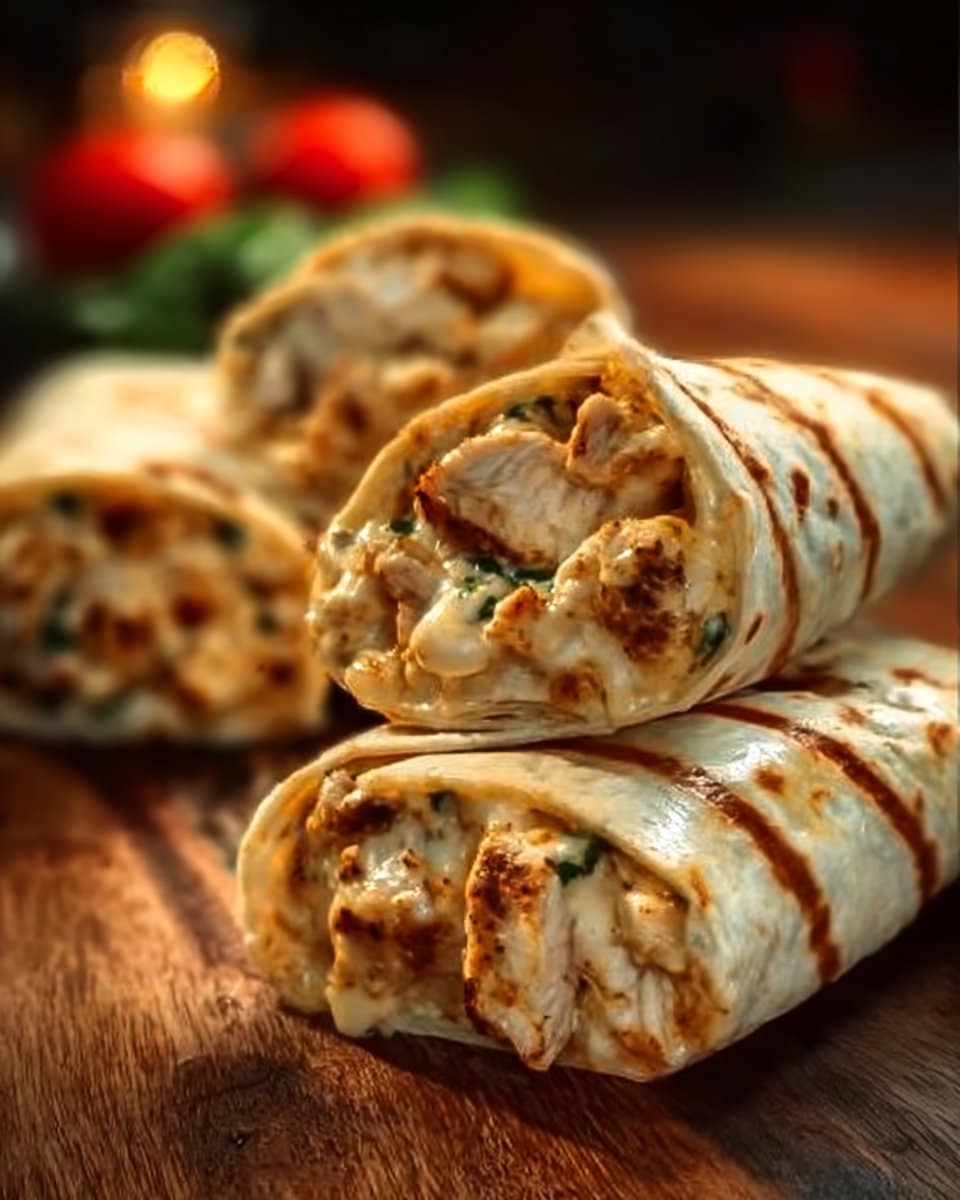
- Slice the wraps on a diagonal to show the melty cheese and colorful filling.
- Place a small ramekin of extra creamy garlic sauce or salsa on the side for dipping.
- Sprinkle chopped fresh parsley or a little smoked paprika on the plate for color.
Pairings that work well:
- A crisp green salad with cucumber, cherry tomatoes, and a lemon dressing.
- Coleslaw or quick pickled red onions to cut through the richness.
- A side of tortilla chips and a light tomato salsa for a relaxed meal.
If you are serving a crowd, arrange the wraps on a large platter and let people pick. Keep extra sauce on the side so everyone can add more if they like.
How to Store Cheesy Chicken Garlic Wraps for Later
Short-term storage:
- Wrap each cooled wrap tightly in aluminum foil or plastic wrap. Place in an airtight container or zipper bag.
- Store in the refrigerator for up to 3 days. The chicken stays safe and the flavors keep well.
Freezing:
- Wrap each assembled but ungrilled wrap in parchment and then in foil to avoid freezer burn.
- Freeze for up to 1 month. For best texture, avoid freezing with fresh lettuce or other crisp vegetables inside. Add those fresh when reheating.
Reheating:
- Oven or toaster oven: unwrap and place on a baking sheet at 350°F for 10 to 12 minutes, flipping halfway. This keeps the tortilla crisp and the cheese melty.
- Stovetop: reheat in a non-stick pan over low to medium heat, pressing lightly until warm and golden. Add a lid for a minute to help the cheese melt.
- Microwave: quick and easy, but tortilla will soften. Microwave for 45 to 60 seconds on medium power, then crisp in a hot pan for 30 seconds per side if you like crunch.
If you want to transform leftovers, chop the reheated wrap and toss into a salad or over rice. For other comforting garlic-and-cheese meals that stretch a little differently, check this crockpot garlic parmesan chicken pasta idea at this slow-cooked recipe which shares the same cozy garlic notes.
Clara’s Tips for Success
- Trim and evenly dice the chicken. Uniform pieces cook at the same rate, preventing dry edges and underdone centers.
- Don’t overcrowd the pan. If chicken pieces are too close, they steam rather than brown. Cook in batches if needed.
- Warm the tortillas before assembling. A 10 second microwave or a quick toast in the pan makes folding easy and prevents tearing.
- Use a mix of cheeses. Cheddar gives flavor, mozzarella gives stretch. If you have only one, use a cheese you love.
- Taste and adjust. A pinch more salt or a squeeze of lemon over the finished wrap can brighten the whole dish.
These small steps add up. The recipe is forgiving, but these details help bring consistent, confident results.
Simple Variations to Try
Make it your own with a few easy swaps. Each variation keeps the basic method but changes the flavor profile.
- Spicy kick: add 1/4 teaspoon cayenne or a few dashes of hot sauce to the chicken before cooking. Serve with sliced jalapeños.
- Mediterranean twist: swap the garlic sauce for tzatziki, use feta instead of cheddar, and add sliced olives and tomatoes.
- BBQ style: toss the cooked chicken with 2 to 3 tablespoons of your favorite BBQ sauce, use smoked cheddar, and add thinly sliced red onion.
- Veggie-packed: add sautéed bell peppers, onions, and mushrooms to the chicken while cooking for more texture and color.
- Low-carb: use large lettuce leaves or low-carb tortillas and reduce the cheese to keep things lighter.
- Breakfast version: add a scrambled egg and swap mozzarella for pepper jack, then fold into a wrap for a hearty morning meal.
These variations show how flexible the recipe is. Try one at a time and note what you enjoy most. The structure of the wrap is the same, so each change is low-risk and high-reward.
Cheesy Chicken Garlic Wraps
Ingredients
Method
- In a bowl, combine the diced chicken with olive oil, garlic powder, onion powder, paprika, salt, and pepper, ensuring the chicken is evenly coated with the seasonings.
- Let the chicken sit for 5 minutes if you can to help the flavors soak in.
- Heat a non-stick pan over medium heat. Add the seasoned chicken to the pan and cook for about 6-8 minutes, stirring occasionally, until it is golden and fully cooked through.
- Check doneness by cutting one piece; it should be white through and juices should run clear. If you have an instant-read thermometer, the target is 165°F (74°C).
- Remove from heat and let cool slightly.
- Lay the tortillas out on a flat surface. Spread a layer of creamy garlic sauce over each tortilla.
- Evenly distribute the cooked chicken on top of each tortilla, aiming for a long line down the center, leaving about an inch at each edge.
- Sprinkle with shredded cheddar and mozzarella cheese.
- Fold the tortillas over the filling to create a wrap.
- In the same non-stick pan, grill the folded wraps for 2-3 minutes on each side, or until the cheese is melted and the tortillas are golden and crispy.
- Remove from the pan and cut each wrap in half. Garnish with freshly chopped parsley, if desired, and serve immediately.
Nutrition
Notes
Tried this recipe?
Let us know how it was!FAQs About Cheesy Chicken Garlic Wraps
Can I make this ahead of time?
Yes. You can cook the chicken and prepare the fillings a few hours in advance. Keep everything refrigerated, then assemble and grill just before serving so tortillas stay crisp. If you plan to serve later that day, assemble and grill 30 minutes before guests arrive to maintain texture.
Can I use precooked or rotisserie chicken?
Absolutely. Shredded rotisserie chicken is a great shortcut. Simply toss the cooked chicken in the seasoning and warm it briefly in the pan to pick up flavor and a bit of crisp. Using precooked chicken reduces prep and cook time significantly.
How do I keep the wrap from getting soggy?
The keys are moderate sauce, warm tortillas, and quick grilling. Spread a thin layer of sauce rather than a puddle, give the cooked chicken a moment to cool to prevent steam, and grill the folded wraps to create a crisp outside shell that resists moisture.
What if I only have corn tortillas?
Corn tortillas are smaller and more fragile. Use them for smaller, taco-style versions. Warm them well before folding and consider using less sauce to avoid breaking. You may need to assemble smaller portions and eat them like tacos rather than fold into a large wrap.
How do I make a larger batch for a party?
Cook the chicken in a large skillet or two pans side by side to keep pieces from crowding. Keep the cooked chicken warm in a low oven while you assemble wraps. Grill them in batches, and hold finished wraps on a warm plate in a single layer so they stay crisp without sweating.
How can I tell when cheese is perfectly melted?
Watch for a glossy sheen and a little stretch when you gently press the wrap with the spatula. If cheese is still opaque, give it another 30 to 60 seconds over low heat. Don’t rush with high heat as the tortilla can brown too quickly before the cheese melts.
Final Encouragement or Closing Note
You’ve got everything you need to make these Cheesy Chicken Garlic Wraps feel effortless and satisfying. The recipe is built to help you succeed, with clear steps and sensory cues to guide you. Start with the basics, trust your senses, and don’t be afraid to tweak seasoning to your taste. Cooking should feel like a conversation, not a test.
I hope this Cheesy Chicken Garlic Wraps helps you discover how simple and rewarding homemade cooking can be. You’ve got this.
Conclusion
If you want another take on a similar crowd-pleasing wrap, take a look at this version called Cheesy Garlic Chicken Wraps, which shares friendly techniques and extra flavor ideas. For a slightly different spin and inspiration for fillings and presentation, explore Cheesy Chicken Wraps | Spicedblog for more recipe notes and serving suggestions.