
There’s something special about The Nightmare Before Christmas Oreo Pops — the way its aroma fills the kitchen and makes everyone wander in for a taste. This delightful treat combines the sweet, familiar flavor of Oreo cookies with the whimsical charm of Halloween, inviting you to embrace the spirit of the season. Picture a gathering of friends, laughter filling the room, as everyone reaches for these colorful, fun pops. It’s not just a dessert; it’s an experience, crafting memories with each bite. Whether you’re a seasoned baker or it’s your first time in the kitchen, you can create these enchanting Oreo pops that are sure to bring smiles all around.
Why You’ll Love Making This The Nightmare Before Christmas Oreo Pops
The Nightmare Before Christmas Oreo Pops are appealing for many reasons. For one, they’re incredibly easy to make, requiring no baking or advanced skills. They provide a fun way to bring a bit of festive magic into your home, whether you’re planning for a Halloween party or just a cozy night in. Plus, these pops are wonderfully customizable, letting you express your creativity through toppings and decorations, and they taste absolutely decadent. Imagine sinking your teeth into a crispy cookie, surrounded by smooth, sweet chocolate—a comforting combination that feels both familiar and exciting.
The best part is that the entire process of making these Oreo pops lends itself to family involvement, making it an excellent way to encourage teamwork in the kitchen. Even kids can lend a hand, stirring up excitement and laughter while decorating. So, gather your loved ones, put on a bit of Halloween music, and let’s get started on crafting these sweet treats that are sure to be the centerpiece of any celebration.
“Cooking isn’t about perfection. It’s about enjoying every delicious step.”
Step-by-Step: How to Make The Nightmare Before Christmas Oreo Pops
Before we dive into the nitty-gritty of ingredients and steps, it’s essential to have a game plan in mind. Cooking doesn’t need to be complicated; it can be as fun as a joyful adventure in your kitchen. With The Nightmare Before Christmas Oreo Pops, you’ll find that each step is simple and manageable. Let’s unlock the secrets of creating these delightful treats.
Ingredients You’ll Need for The Nightmare Before Christmas Oreo Pops
To get started, you’ll need a few straightforward ingredients. Here’s a breakdown to help you gather everything before you start:
- Oreo cookies: Classic and flavorful, these will form the base of your pops.
- White chocolate or candy melts: For a smooth and sweet coating, choose your favorite.
- Black melting chocolate: This adds a spooky touch to resemble Jack Skellington’s iconic face.
- Candy eyes: These little treats will give your pops a playful, ghostly look.
- Lollipop sticks: They hold the cookies together and make them easy to handle.
- Sprinkles (optional): Add a pop of color and fun to your designs.
Each ingredient plays a vital role in the end result, ensuring that your Oreo pops are both delicious and visually captivating. Now that we have our components ready, let’s move on to the cooking directions.
Directions: Cooking with Confidence
Insert lollipop sticks into the Oreo cookies. Start by gently pushing the stick into the center of each cookie. Be careful not to break the cookie.
Melt the white chocolate or candy melts in a microwave-safe bowl. Heat in short bursts of 15 to 30 seconds, stirring after each interval until the chocolate is completely smooth.
Dip each Oreo in the melted chocolate, ensuring it’s fully coated. Hold the stick and submerge the cookie in the chocolate, letting excess chocolate drip off.
Place the coated Oreos on a baking sheet lined with parchment paper. Make sure they have enough space to avoid sticking together as they harden.
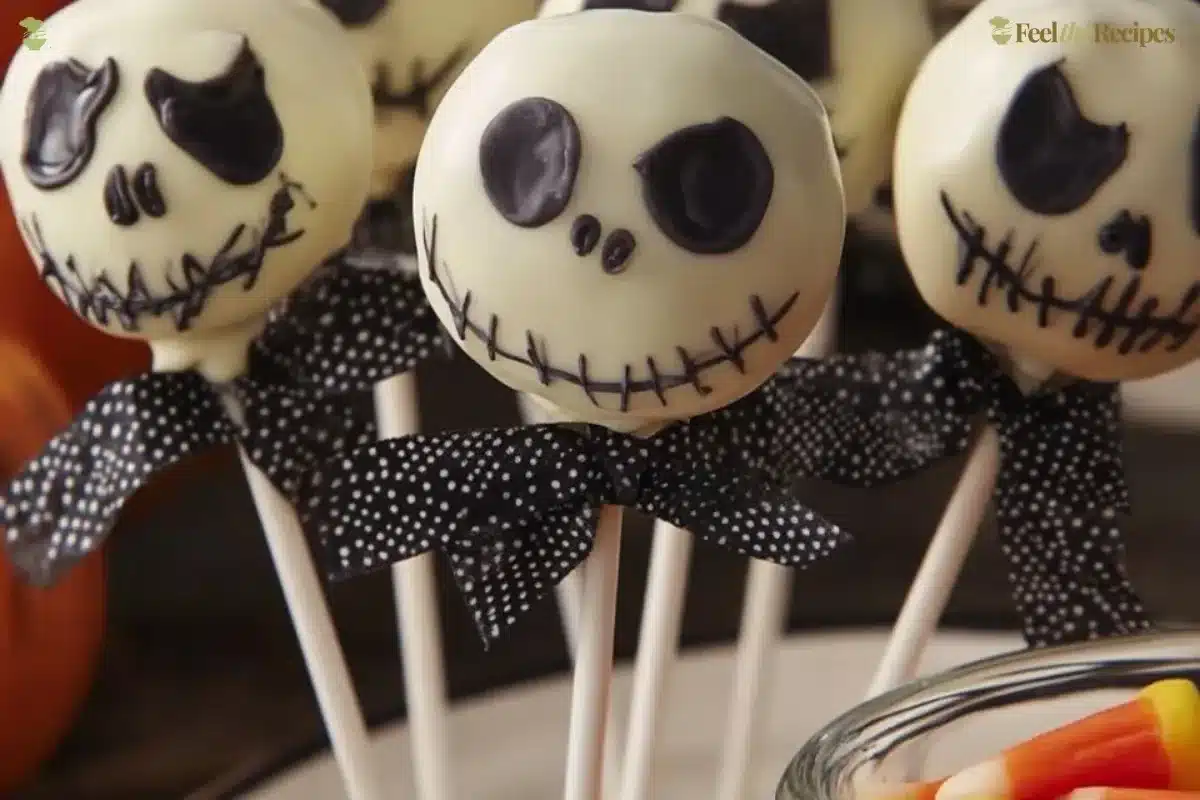
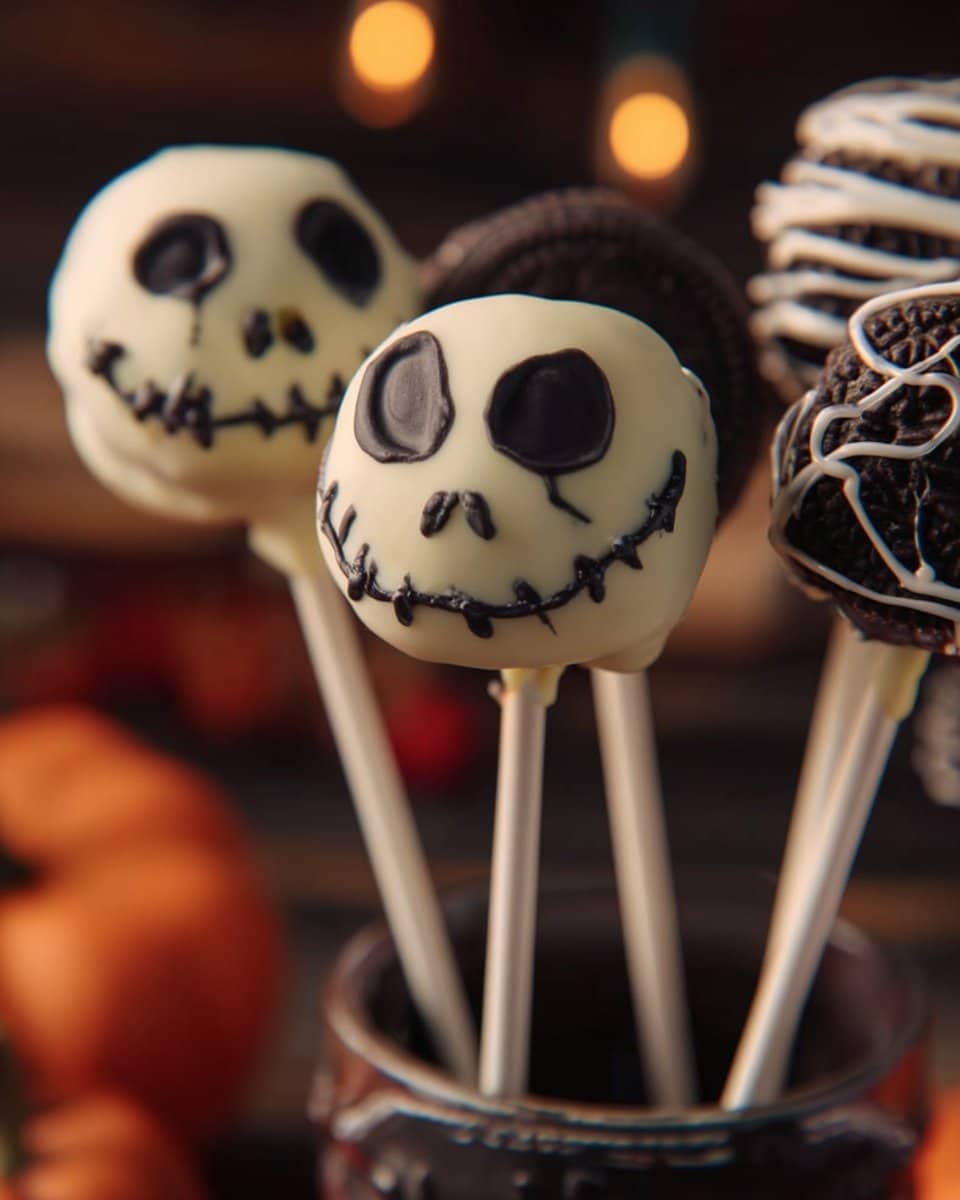
Use black melting chocolate to drizzle or create decorations resembling Jack Skellington’s face on the pops. You can use a squeeze bottle for more control.
Add candy eyes for a spooky effect. While the chocolate is still wet, carefully place the candy eyes onto the face to bring your creations to life.
Optional: Decorate with sprinkles before the chocolate dries. This fun step allows you to showcase your personality and style.
Serve at your Halloween party! These pops are sure to be a crowd-pleaser and attract attention.
With each step, don’t hesitate to bring out your creativity. Adjust the decorations, add more candy eyes, or create fun patterns. The possibilities are virtually endless, and the experience of making these Oreo pops is just as satisfying as eating them.
How to Serve The Nightmare Before Christmas Oreo Pops and Make It Shine
When it comes to serving these treats, presentation matters. You might want to create a festive display for your party guests to marvel at. Here are a few ideas to make your Oreo pops shine:
Creative Stands: Use a cake pop stand to arrange the pops beautifully. This simple addition automatically elevates your presentation.
Spooky Platter: Consider a dark, Halloween-themed platter or a festive tablecloth to create an inviting atmosphere. Scatter a few spooky decorations around the serving area.
Pairing Options: These Oreo pops pair wonderfully with hot chocolate or pumpkin spice lattes. Guests will appreciate a sweet treat with their warm drinks.
Themed Takeaway Bags: For parties, consider small, clear bags tied with ribbons to let your friends take home some of the magic.
How to Store The Nightmare Before Christmas Oreo Pops for Later
If you have leftovers (or want to make them ahead of time), keep the pops fresh and delicious. Here’s how to store them:
Room Temperature: The Oreo pops can be stored at room temperature for about 3 to 5 days. Just ensure they are in an airtight container to prevent them from getting stale.
Refrigeration: If you prefer chilling them, they can last up to a week in the refrigerator. It’s best to place them in a single layer to keep the decorations intact.
Freezing: For longer storage, you can freeze the pops. Wrap each individually in plastic wrap, then place them in an airtight freezer bag. They can be stored this way for up to a month. When you’re ready to enjoy, let them thaw in the fridge.
Discover What’s Trending Now
Wondering what recipes are stealing the spotlight?
Check out our Recipe Trends page for fresh ideas, seasonal favorites, and dishes people can’t stop talking about.
See what’s hot in the kitchen this week and bring the buzz straight to your table!
Clara’s Tips for Success
Here are a few friendly tips to help you on your journey to making The Nightmare Before Christmas Oreo Pops truly magical:
Chocolate Temperature: Ensure your melted chocolate isn’t too hot, as this can cause it to seize when you dip your Oreos. A good temperature is just warm enough to melt smoothly.
Double-Dip: If you want a thicker coating, feel free to dip each Oreo pop twice, letting them harden between dips.
Color Options: Experiment with different colored melts for seasonal variety. Using colored candy melts can turn your pops into delightful surprises for any occasion.
Decorate with Precision: For the best results, use a piping bag for drizzling the black chocolate. It gives you more control for fine decorations.
Test Before Serving: Before serving, visually evaluate each pop. If any look too bare, consider adding extra sprinkles or more chocolate designs.
Simple Variations to Try
Once you’re comfortable making The Nightmare Before Christmas Oreo Pops, why not explore some variations? Here are a few ideas to get you started:
Flavor Variations: Try using different flavored Oreo cookies, such as mint or peanut butter, for an exciting twist.
Themed Characters: You can design pops inspired by other characters from Halloween movies or themes, whether a spooky witch or a playful ghost.
Filling Options: Consider filling some Oreos with flavored cream cheese or marshmallow fluff for an added surprise when your guests take a bite.

The Nightmare Before Christmas Oreo Pops
Ingredients
Method
- Insert lollipop sticks into the Oreo cookies by gently pushing the stick into the center of each cookie. Be careful not to break the cookie.
- Melt the white chocolate or candy melts in a microwave-safe bowl. Heat in short bursts of 15 to 30 seconds, stirring after each interval until the chocolate is completely smooth.
- Dip each Oreo in the melted chocolate, ensuring it’s fully coated. Hold the stick and submerge the cookie in the chocolate, letting excess chocolate drip off.
- Place the coated Oreos on a baking sheet lined with parchment paper. Make sure they have enough space to avoid sticking together as they harden.
- Use black melting chocolate to drizzle or create decorations resembling Jack Skellington’s face on the pops. You can use a squeeze bottle for more control.
- Add candy eyes while the chocolate is still wet. Carefully place the candy eyes onto the face to bring your creations to life.
- Optional: Decorate with sprinkles before the chocolate dries to showcase your personality and style.
- Serve at your Halloween party! These pops are sure to be a crowd-pleaser and attract attention.
Nutrition
Notes
Tried this recipe?
Let us know how it was!FAQs About The Nightmare Before Christmas Oreo Pops
Can I make this ahead of time?
Yes! This recipe keeps beautifully. Prepare them a day or two in advance and store them properly. They’ll still taste fabulous.What can I use instead of lollipop sticks?
If you don’t have sticks on hand, you can use pretzel rods or simply serve them on a decorative platter for a fun centerpiece.Can I use dark chocolate instead?
Absolutely! Dark chocolate would impart a richer flavor and pair well with the sweetness of the Oreos.Is there a gluten-free option available?
You can use gluten-free Oreo cookies and ensure all other ingredients are gluten-free to make a delicious version for those with dietary restrictions.What can I do if the chocolate hardens too quickly?
If your chocolate hardens too fast while you work, try reheating it in short bursts to maintain a smooth texture for dipping.
Final Encouragement or Closing Note
I hope this guide to making The Nightmare Before Christmas Oreo Pops helps you discover how simple and rewarding homemade cooking can be. Remember, each step is part of the joy of creating something special. You’re not just making a treat; you’re crafting an experience that brings people together. So, roll up your sleeves and get that chocolate melting. You’ve got this. Enjoy every moment in your kitchen; magic awaits with each bite!
Stay Connected with Feel the Recipes
Love cooking and sharing good food? Let’s stay connected! Clara posts new recipes, helpful tips, and little moments from her kitchen every day to keep you inspired.
Join our growing community of home cooks who believe food is meant to be simple, joyful, and shared around the table.
👉 Facebook: Follow us on Facebook
📌 Pinterest: Explore our boards for endless recipe inspiration
🐦 X (Twitter): @feeltherecipes for quick tips and updates
📸 Instagram: @feeltherecipes for fresh photos and behind-the-scenes peeks
Let’s keep cooking, creating, and sharing. Whether you’re here for classic comfort food or something new to try, we’re just a click away.